

How To Mask Something In Photoshop
Photoshop layer masks offer avant-garde command over image transparency, one of the most bones functionalities of Photoshop. Considering of their key nature, every Photoshop user should accept a working understanding of layer masks and how to employ them. They open huge doors to creative possibilities and help Photoshop users knock out unproblematic tasks likewise!
What is a Photoshop layer mask?
—

Photoshop layer masks control the transparency of the layer they are "worn" by. In other words, the areas of a layer that are subconscious by a layer mask actually go transparent, assuasive prototype data from lower layers to show through.
To utilise a elementary analogy, Photoshop layer masks work similar to masquerade ball masks. These masks hide some areas of a persons face and reveal others—often the eyes, nose and mouth. Similarly, Photoshop layer masks can be used to hide and reveal sections of a layer.
Why use layer masks?
I hateful… can't I but utilise the eraser tool to remove parts of an image? The answer is yes! Withal, if you exercise those parts of the paradigm will be lost forever. That method resides in what we consider a destructive workflow.
Layer masks, on the other hand, leave the original layer pixel data untouched. This means you can play with the transparency in a multitude of ways without harming the layer content or creating an irreversible mess. With that said let's jump in!
Layer mask tutorial
—

Photoshop provides a complete set up of functions for handling layer masks. Permit'southward start by adding a layer mask to a layer.
First, select the layer you desire to mask (in this case Layer 1), then click the layer mask button as highlighted above. Alternatively, you can navigate to Layer > Layer Mask > Reveal All (we'll get to the other options later). As seen in the instance above, a white rectangle appears to the right of the prototype thumbnail.
Despite the fact that nosotros've added a layer mask, nil has visibly changed on the canvas. The reason for this has to practice with the contents of the layer mask. That's right, layer masks hold pixel information besides! In fact, they can be thought of as layers in their own right, existing in a parallel universe.
Currently, the layer mask in our example holds entirely white pixels, as seen in the layer mask thumbnail. This means the areas of a layer mask that hold white pixels allow the same pixel area of their respective layer to show through.
Layer mask filled with blackness
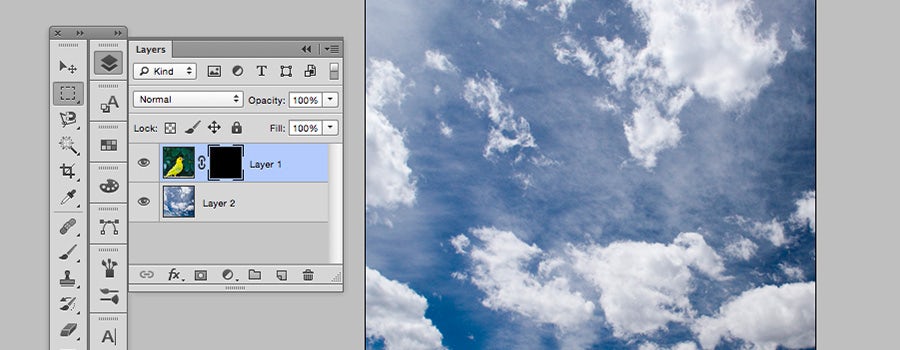
What happens if nosotros replace the layer mask's white pixels with blackness pixels? Just click the layer mask thumbnail, and then click Edit > Fill . Allow's choose black. Instantly we see that the layer mask thumbnail turns black, and the corresponding layer disappears from the canvas – revealing the clouds in Layer 2!
Opposite to our previous example, which uses a layer mask filled with white pixels, layer masks filled with black pixels create full transparency in the respective pixel area of the layer which is masked.
Tin you guess what happens if nosotros fill half the layer mask with white and half with blackness? That's right! Half the prototype becomes visible while the other half stays transparent. In this case, we would see half clouds and half bird.
Layer mask filled with gradient

Layer masks don't finish with black and white. In fact, layer masks can concur any form of grayscale pixel information. Allow'due south see what happens if we fill the layer mask with a slope ranging from black to white!
Press G to switch to the slope tool, so select the layer mask by clicking on its thumbnail. Finally, let'due south elevate the gradient tool across the sail. Equally you tin see, the thumbnail fills with a slope from black to white and the respective layer smoothly transitions betwixt full opacity and full transparency.
In essence, the clouds in Layer 2are "showing through" the areas of Layer i,which accept become transparent as a event of the gradient layer mask.
Layer mask filled with photographic content
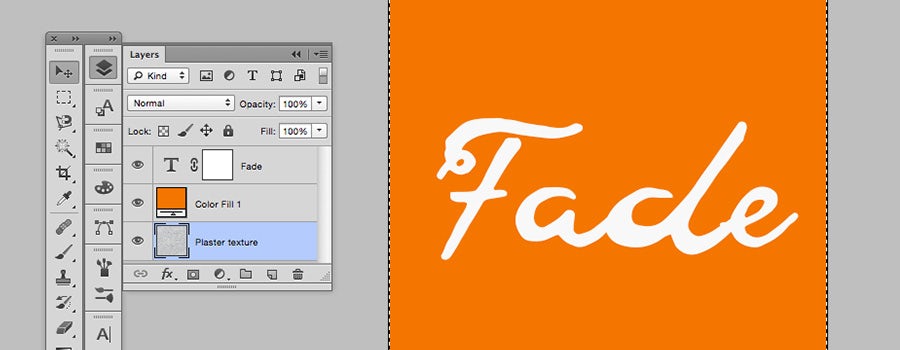
Let's not terminate there! If layer masks tin can agree whatsoever grayscale information, why not endeavor to mask a layer with something photographic? In this example, we will try using a textural paradigm of plaster to mask the give-and-take "Fade", which we've set in a vintage cursive font.
To start, let'southward create a layer mask on the "Fade" layer. Next, copy the contents of the plaster layer by clicking its thumbnail, then pressing Ctrl/Command + A to select all, and so Ctrl/Command + C to copy.

To paste this image into the layer mask on the plaster layer nosotros need to enter into the "parallel universe" of the layer mask and we practise that by holding alt/option then clicking the layer mask thumbnail.
Now, the canvas displays the contents of the layer mask. Absurd, huh? Paste in the plaster image past pressing Ctrl/Command + V .

To escape this "parallel universe" (isn't this fun?), simply click the layer thumbnail (the capital "T" symbol). Groovy! Now "Fade" has a plaster texture that lets some of the colored groundwork show through.
You can fine tune the layer mask by clicking the layer mask thumbnail again and selecting Image > Adjustments > Brightness & Contrast . Perfect! What we dear about this technique is that it lets the layer below, in the example a warm orange color make full, show through the textural variance.
The chain-link

You may also be wondering what that chain-link is doing between the layer thumbnail and layer mask thumbnail? Quite simply, this chain-link ways that if you move the layer paradigm on the canvas, the layer mask will move around with it.
This tin be incredibly useful. For instance, if you lot've carefully cutting out the background of an image and need to reposition information technology on the canvass. Otherwise, you might be experimenting, trying to find the perfect area of a design to "allow through" a layer mask. In this case you would desire to disable the chain-link. That's easy! Merely click it.
Determination
—
Now you should feel similar y'all have a better understanding of layer masks! Bringing this tool into your workflow will make y'all a amend Photoshop user based on your increased facility to enter into new artistic possibilities!
How else have you used Photoshop layer masks? Annotate below!

How To Mask Something In Photoshop,
Source: https://99designs.com/blog/design-tutorials/how-to-use-photoshop-layer-masks/
Posted by: smithdified81.blogspot.com

0 Response to "How To Mask Something In Photoshop"
Post a Comment